A good bot is one that adequately understands user input and responds with useful, correct, and understandable information. A great bot will go further to encourage user engagement and take conversational turns.
This guide will lead you through the detailed steps of ensuring that a bot adequately understands user input by:
- Predicting what users will want to know and include them in the bot.
- Creating a well-categorized and well-trained intent structure, so that typed user questions are understood.
- Identifying where buttons may be necessary to supplement typed user questions.
- Identifying where structured input and forms may be necessary.
To also ensure that a bot provides adequate output, we need to:
- Inform the user what the bot is, what it can do, and how to interact with it.
- Provide adequate guidance when the user gets lost.
- Respond with relevant information in the most efficient format.
- Make sure the bot speaks in an appropriate and consistent voice.
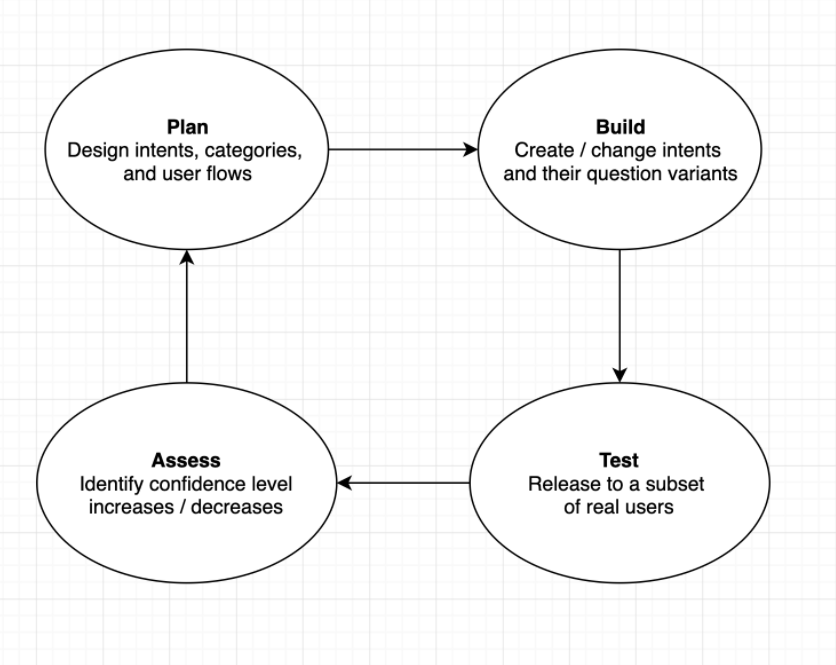
The starting point for building a bot should be in defining its purpose and function. What topics and user questions it should be able to respond to will then be reflected in its intent structure.
Bot topics and intents roughly fall into two categories: bot-driven and business-driven.
Step 1: Create bot-driven intents
Every bot should be expected to answer questions about what it does, how it works, and provide some fun chit-chat to add engagement and fun to the experience. These intents should automatically be included in every bot regardless of its purpose or type:
“System” intents that help the user navigate the bot:
- Menu
- Help
- Bot info
- Start over
- Yes
- No
- Cancel
- Feedback
- Talk to Human
“Small talk” intents are not directly related to bot function, but are essential to user engagement:
- Hello
- Good morning
- How are you
- Goodbye
- Goodnight
- Tell me a joke
- Good job
- Bad job
- Thank you
Step 2: Create business-driven intents
Which business-specific intents your bot should address will vary by vertical and client, but they should always be based on real user data.
Step 2a: Analyze user data
Sources such as call center FAQs, company knowledgebases, and customer service agent transcripts are often already organized into the categories you need.
If the client has been using Comm100 Live Chat, we can also provide the top-asked questions from their chat history within a time period as a source of data.
Step 2b: Combine similar questions into intents
“Similar” is defined as having the same user goal or function, as opposed to having similar phrasing.
For example, “Download bank statement” and “Can you tell me where to get my bank account reports in online banking?” are worded very differently, but express the same user intention and should be grouped under one intent.
On the other hand, “How do I send an e-transfer” and “How do I send a bill payment” are worded quite similarly, but are obviously different user intents.
It is key to avoid creating intents that duplicate each other or contain overlapping user questions; each user question should only be mapped to one intent.
Step 3: Organize related intents into categories
Well-organized intent categories make intents easier to find when creating new intents or modifying existing ones, and helps in avoiding duplicate intents.
Building Intents
Intents allow the user to interact with the bot through natural language (ie. typed input) instead of solely relying on buttons. Each intent represents one specific user goal and consists of a collection of "question variants", which tell the bot which user questions have the same meaning.
How intents work
After being trained with different examples of how intent can be worded, the bot gradually learns to identify and understand these intents on its own by processing user questions through its Natural Language Processing model. It then maps it to the most fitting intent and returns the response associated with this intent to the user.

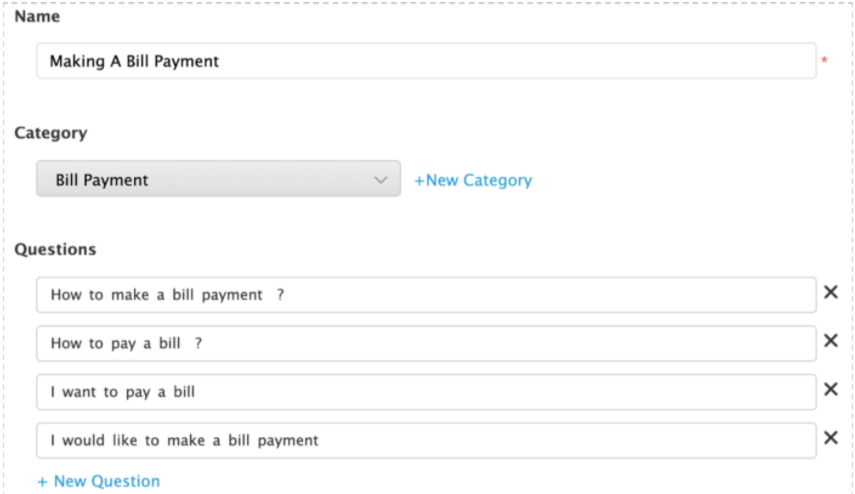
Step 1: Name your intents
Keep the intent name descriptive, user-facing, and under 20 characters. Note that intent names will be displayed in the bot when used as 'suggested topics'.
Step 2: Add question variants to each intent
Assign at least 10 question variants to each intent. You don't have to define every possible example, but the more examples you provide the better. Dialogflow's built-in machine learning model will automatically expand on your list with other similar utterances.
Tips
- Make sure your question variants clearly map to the intent at hand and are not ambiguous. Otherwise, the bot will have a harder time distinguishing between similar intents and will face more confusion when trying to map a user question.
- Eg. “Make a bill payment” should belong to a “Bill Payment” intent while “Make a payment” is too general and should not.
- Put yourself in the users’ shoes and phrase the question variants in a way that bot users would.
- Eg. The user is more likely to say “How to pay bill” than “Hello there, can you please tell me how I can make bill payments?” to a bot. Focus on entering questions like the former.
- Vary the length by creating a long and a short version of every question you enter.
- Eg. “Tell me where to change the password of my account?” vs “change password”
- Create variations by switching up verb tenses, active/passive voice, singular/plural tenses, and keyword synonyms.
Step 3: Maintaining intents
Intent creation is an ongoing process. It is near impossible to predict all possible user questions and behavior, so once real-world users do interact with your bot, it will need to be continuously updated according to the feedback it receives.
User questions that did not match an intent or that were marked with a “thumbs down” by the user can be viewed in the Learning section. These user questions can then be mapped to an existing intent, added to a new intent, or deleted.

While NLP models are generally not yet capable of context-awareness (meaning that context-specific commands like “go back” or “yes” are ambiguous and cannot be understood), there are many cases where follow-up questions are necessary in a user flow.
It is essential to identify these flows and handle context-dependent responses with pre-scripted user input, ie. quick replies. This includes product catalogs, troubleshooting for technical support, or serving up a call to action.
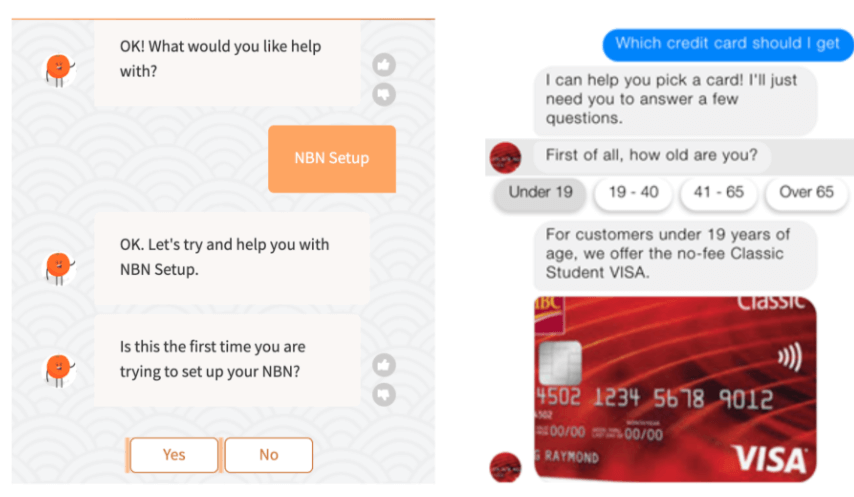
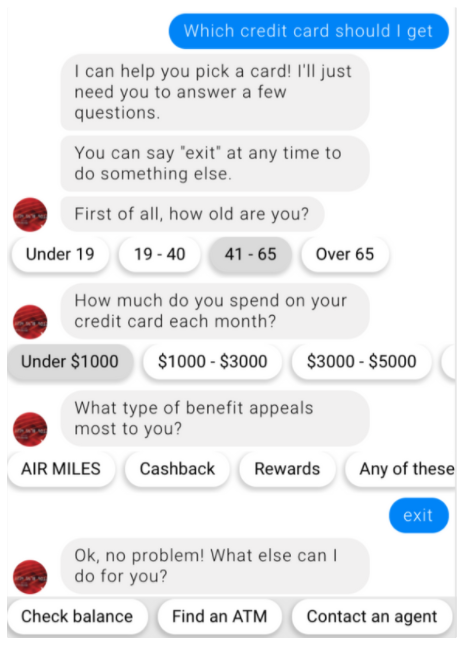
Step 1: Identify where product catalogs are needed
You’ll likely need to build a decision tree wherever products are displayed, as specific products will likely be nested under categories and subcategories. For example, when a user queries about credit cards, the bot will need the user to clarify which type of credit card and/or specific card product they are interested in before it can provide a useful response

Step 2: Identify where decision trees are needed
A decision tree uses a sequence of binary questions to narrow down a final response. Common use cases include product recommendation trees (“Which credit card is right for me?”) or technical troubleshooting flows.
Decision trees should only be used where every question has very limited possible answers. They should not be used where complex input is required, and where the user is likely to type a response that the bot isn’t expecting / can’t understand.
The keyboard should also ideally be disabled so that the user can only select the button options displayed.
Step 3: Add follow-up prompts
Besides allowing users to narrow down a category, decision trees can also allow the user to move horizontally to a related topic.
For example, if a user asks the bot about the benefits of a Classic Student VISA credit card, it is likely they will also want to know what the applicable fees or application process is.
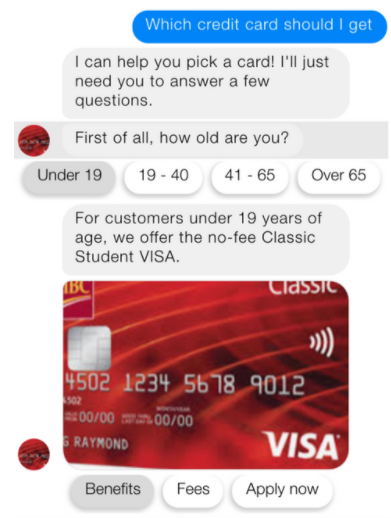
These button options save the user from having to type out their next query, but also serves as a topic discovery function for the bot.
It is also good practice to display the most commonly asked topics as options after a ‘dead end’ has been reached in the conversation.
Step 4: Add exit options to your flows
Consider that users may change their mind in the middle of the decision tree or catalog and decide not to continue; they will likely type “exit” or “start over”, or simply say “no thanks”.
Make sure your intent structure is set up to handle commands like this, and provide a quick tip at the beginning of the flow on how to start over or return to the main menu.
Step 5: Add flexibility to your flows
Also, consider that users may try to modify an input that they’ve already entered, or 'go back’ to a previous step of the flow without having to start all over from the beginning.
Ideally, you should prepare your chatbot to deal with these interruptions rather than pushing them down a fixed decision tree by building “go back” buttons at every decision point. However, this is extremely labor-intensive; a quicker solution is to disable the keyboard so that the user can only select the button options displayed.
An entity modifies an intent to become more specific. Adding an entity to an intent allows the bot to identify keywords within a phrase to provide answers that are context-relevant and useful to the user. The bot can also prompt the user to provide input whenever an entity is missing.
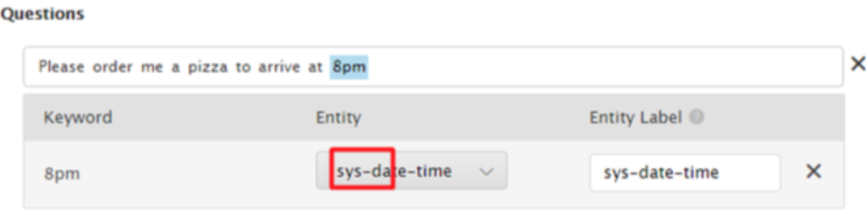
Entities perform best as easily isolated keywords, for example, nouns like "credit card" or ”John”, or as parameters like times, dates, and street addresses. An entity has many synonyms associated with it; synonyms allow your bot to recognize different variations of the same entity.
Step 1: Identify which intents may need entities
Review your intents to see where entities may help in providing more specific and useful responses.
For example, an ‘ATM finder’ intent can be coupled with a ‘city’ entity and the synonyms ‘New York’, ‘Baltimore’, ‘Philadelphia’, etc. Now the bot can respond with ATMs located in one of those specific cities.
A ‘Check my account balance’ intent can be paired with an ‘account type’ entity, with synonyms ‘savings account’ and ‘checking account’. The user can now specify whether they’re looking for their savings balance or checkings balance.
Step 2: Create the entities and their synonyms
Create the entities you need and their synonyms in the Entity section of Comm100, then select and map them to keywords within question variants:
Comm100 also provides 26 common prebuilt entities, identifiable by the prefix “sys” in the entity index. They include values like temperature, date, distance, time, monetary amounts, weight, and dimensions.
You can also import an external list of entities and synonyms. For an in-depth explanation of these processes, consult the AI Chatbot User Manual.
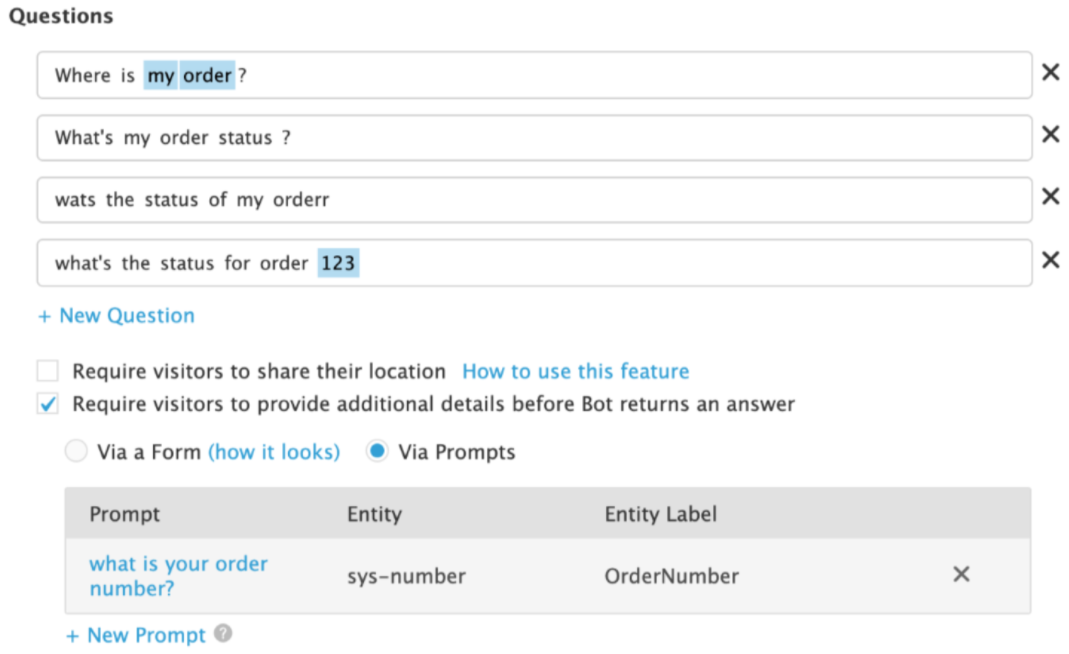
Step 3: Create forms and prompts for missing entities
If a user asks “Help me find an ATM” instead of “Help me find an ATM in Baltimore”, we can either reply with the location of every ATM in the US, or we can create a prompt that asks the user to specify which city they are asking about.
Prompts only require the user to fulfill one missing entity, while forms can ask for multiple. To learn how to create prompts and forms, consult the AI Chatbot User Manual.
The way you greet users to your bot should set them up for success. Unlike apps or websites, chatbots are often an unfamiliar medium with few visual cues that indicate how users should interact with them.
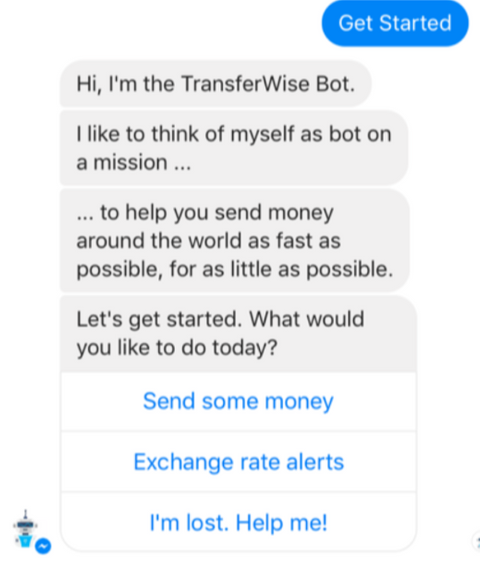
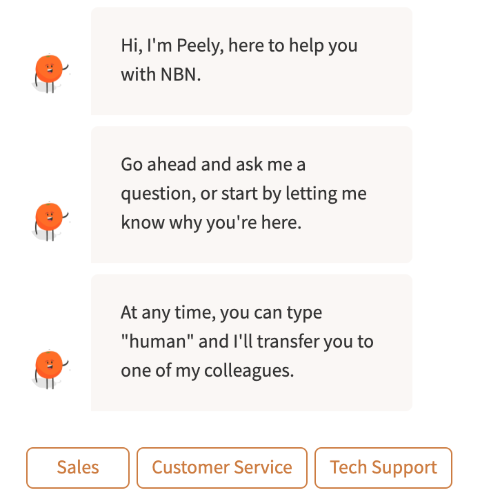
Step 1: State bot purpose and identity
Introduce the user to the bot with a name, persona, and image. Make it clear which company or brand the bot is representing and use this to engage the user.
It is important to clearly announce that the user is interacting with a chatbot, not a human. This sets expectations and avoids user frustration.
Step 2: Tell users what the bot can do
Make it clear that the bot can only answer questions around a certain topic with a phrase like "I'm a banking bot. I can check your balance, find the nearest ATM, and tell you what savings accounts are on offer."
Step 3: Let users know how to interact with the bot
It's not always obvious that users can use natural language to interact with a bot. Encourage users to pose "one simple question at a time", as bots typically can't understand long multi-intent utterances (yet).
Step 4: Give the user a starting point.
Giving information is important, but don’t leave the user hanging by leaving the next step open-ended.
Determine what the client's top 3 to 5 intents are, and prompt the user to query for them with calls to action like "Try asking me 'What is my balance?'” or “Choose one of these buttons to get started!”
Step 5: Provide fallback
Even the most well-designed bot can’t replace human agents. An important functionality of any bot is connecting the user with a real person when needed, and it is essential to make the user aware of this right off the bat.
Let them know that commands like “human” or “live agent” will connect them with a real person if the bot just isn’t cutting it. Of course, make sure that these common user commands are added to your intent structure and that they work.
Bots aren't very good at detecting context within a conversation (yet). Given this limitation, it must compensate by being prepared to handle users when they get lost, want to cancel an action, or switch to a different task in the middle of a chat.
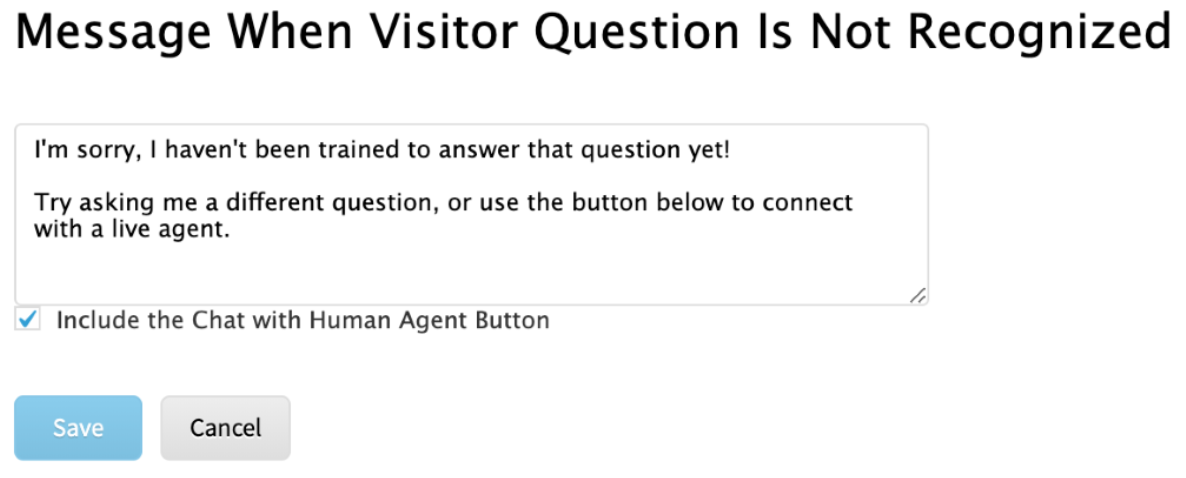
Step 1: Craft useful error messages
The error message (named “Message when Visitor Question is Not Recognized” in Comm100) needs to deal proactively with ambiguities and misunderstandings by:
- Being transparent and concise about why the user’s question or action couldn’t be answered or fulfilled (eg. “I haven’t been trained to answer that question yet”)
- Providing clear instructions on how the user should address the problem (“Try asking me a different question”)
- Giving the user a fallback option in case they have already exhausted the bot’s capabilities, and just prefer speaking to a human at this point (“Use the button below to connect with a live agent”)
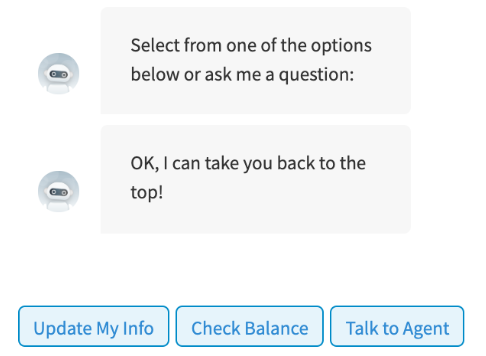
Step 2: Enable menus
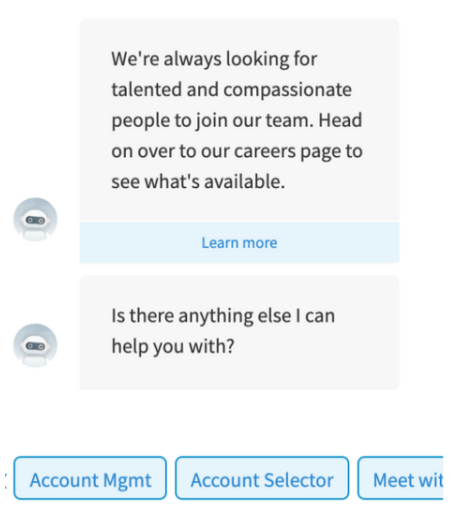
A menu of commonly-asked topics is important not only in the user onboarding experience but also in cases where a user is lost or wants to return to the beginning. Menus are the ‘homepage’ of a chatbot and should be included in the responses for the following intents:
- “Menu” – user explicitly asks to see a menu
- “Help” – user expresses the need for assistance in navigating the bot
- “Bot abilities” – user is essentially asking for a repeat of the onboarding process and an explanation of what the bot can do
- “Exit” – user may be in the middle of a user flow and is asking to restart
Make sure to acknowledge the user’s request and to always include the option to speak to a human.
Comm100 allows responses to be created from a combination of different formats, including text, images, quick replies, persistent buttons, webhooks, and webviews.
This section will outline best practices for the most common formats – text, persistent buttons, and quick replies. For a detailed explanation of the capabilities and technical limitations of each format, see the AI Chatbot User Manual.
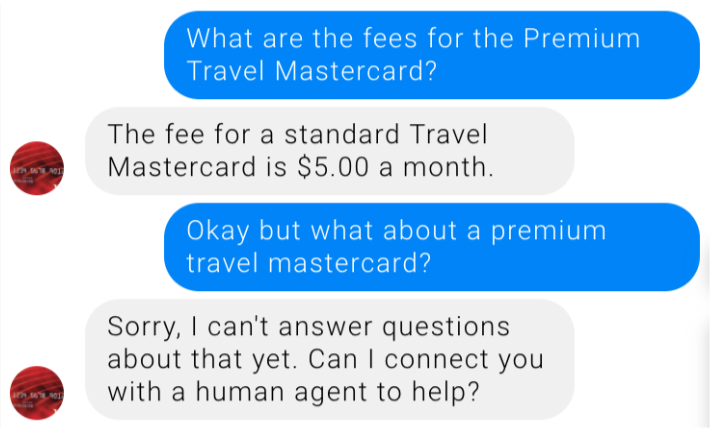
Step 1: Use complete sentences
This confirms to the user that the bot understood their question correctly and is providing a relevant response.
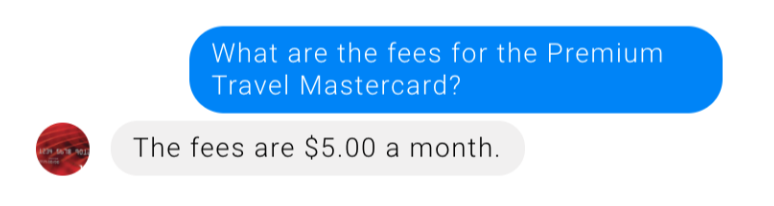
Consider the example below; the bot understands that the user is asking about a Travel Mastercard fee, but it hasn’t been trained to differentiate between “Premium Travel Mastercard” (which has a higher $10 monthly fee) and your average “Travel Mastercard” (which has a $5 monthly fee).
It thus returns the fees response for a regular Travel Mastercard – but the user doesn’t know that.
A response with a complete response could have prevented this misunderstanding:
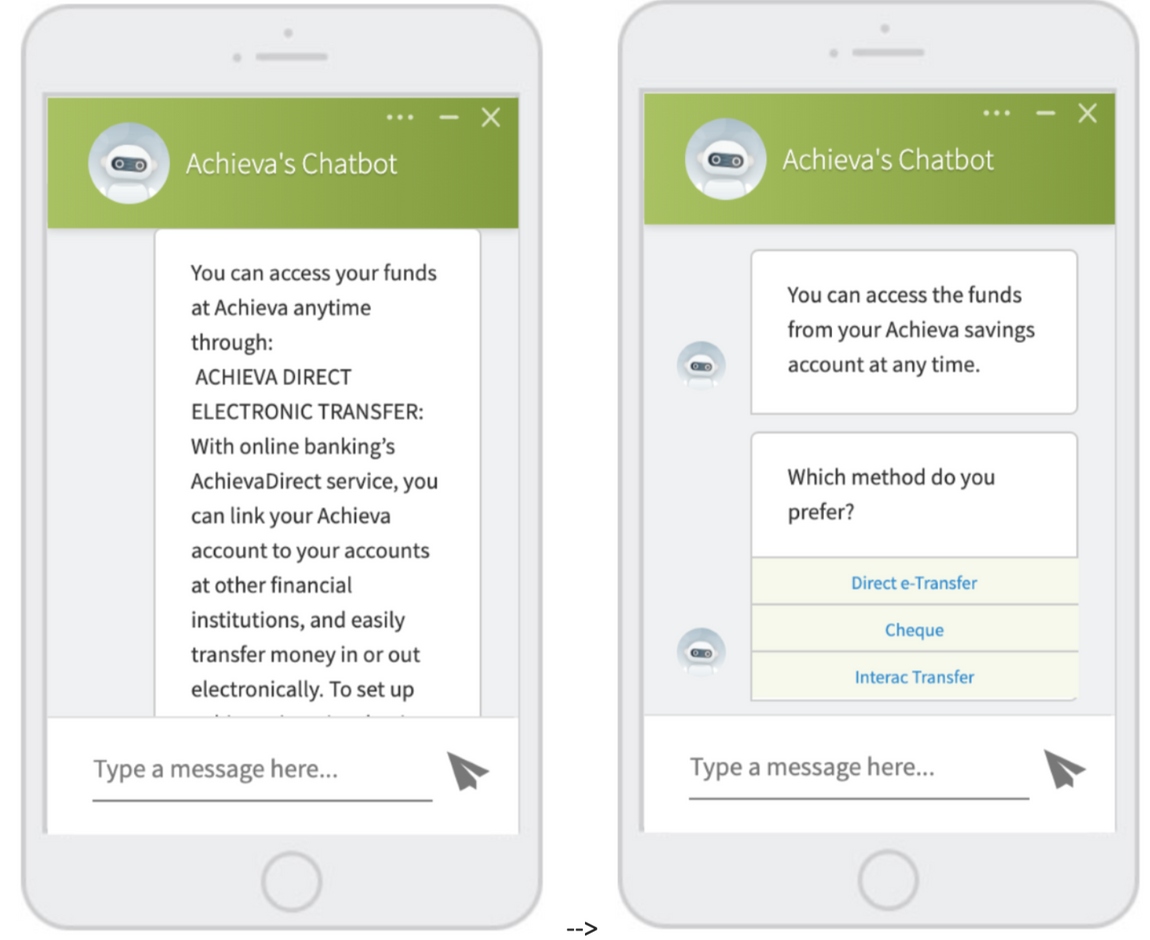
Step 2: Keep responses concise
Having a clearly written response is as important as providing an accurate response. The general rule of thumb is around 300 characters or 2 sentences per text response, as this allows the entire message to be seen on the screen without having to scroll up.
If a long response is necessary, break it up into multiple messages. You can also consider converting multi-part responses into a tree with quick replies.
Step 3: Use a consistent voice and point of view
Either have the bot refer to itself as "I, the bot" or "we, the company" across all your copy, including copy used in button titles.
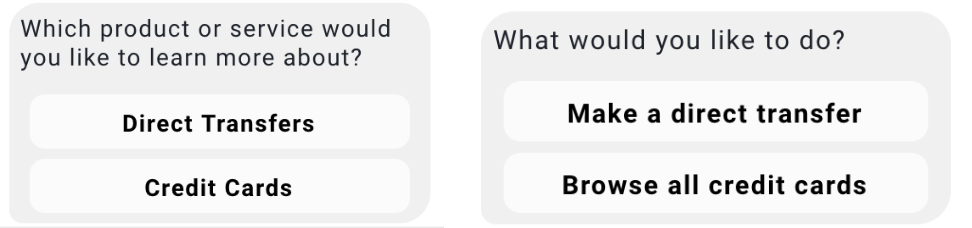
Step 4: Use consistent capitalization for button titles
There are two rules for capitalization when it comes to labeling your buttons and quick replies:
- Title-case capitalization should be applied to product names and proper nouns such as “Direct Transfer” and “Credit Cards”
- Sentence-case capitalization should be applied to calls to action and sentences such as “Make a direct transfer” and “Browse all credit cards”
Step 5: Verify your language is locale-appropriate
Not only do the formatting rules for currency, abbreviations, and oxford commas differ across countries, you should also make sure you’re speaking in the language of your average user. For example, a “transit number” may mean different things in the United States than it does in Canada.
Besides being a branding and marketing asset, a bot persona and voice also help set user expectations by priming the user to speak to the bot in certain ways (short keywords vs. long sentences, formal grammar vs. slang.
Step 1: Determine your bot’s name and persona
A bot character like "Billie the Bank Bot" may encourage a more casual interaction style and result in higher engagement, while a "Bank of America” bot may be treated more like a banking app.
Make a choice based on your primary audience’s age range, and on whether you have a consumer or business-facing bot.
Step 2: Speak with a consistent voice
Refer to the voice and tone of your current branding guidelines.
You might want your banking bot to sound a little less formal than your banking website, but it should still be an obvious extension of the same brand. Warm, human-like tones reflect the norms of conversation flow and make the bot more pleasant to interact with.
Do some digging as to who your primary audience is, and how they would normally converse in a text-based conversation.
Step 3: Keep your visual branding consistent
This includes your bot's logo and any images, giphys, or emojis used in the bot’s responses.